I love cheesecake. It is one of my favorite dessert to make and also eat.
The first time I made a cheesecake was over fifteen years ago when I was first married.
When I got married I owned two cookbooks, both of which were Taste of Home cookbooks that are no longer published. In one of the cookbooks was a recipe for a cheesecake and I decided to tackle making it one year.
I was so proud of the results. I did not even care that it had a giant crack right down the center of it. The crack in the cheesecake did not hurt the taste and everyone loved it. Thus began my love of baking cheesecakes.
I have experimented with many recipes over the years and have yet to make a cheesecake that I did not like, but I will admit that I have made some very ugly cheesecakes and I would guess many of you have too.
You know the ones that I am talking about. The ones with the giant crack down the middle or the edges that are too done. Yes, those cheesecakes that so many of us have made.
I have read and tried many tips and tricks to avoid these issues over the years, but most of them did not work.
However, many years and many cheesecakes later, I have discovered how to avoid that dreaded crack and over doneness that so often happens in homemade cheesecakes.
There are several tips that I think make all the difference in how a cheesecake turns out.
The first one is room temperature cream cheese and it needs to be really room temperature. It needs to be soft. The trick here is that you do not want to over beat the cheesecake ingredients, but you do want your cream cheese mixed in well. Cream cheese mixes better when it is very soft. So, start with softened cream cheese.
Next, you need to beat the cream cheese really well before adding any other ingredients. Again this will help the cream cheese to blend in well, without over beating the remaining ingredients.
You then mix in the remaining ingredients well without over beating them. Over beating your cheesecake filling will affect the texture and final results.
And my number one tip for the best cheesecakes ever is a water bath.
Water bathing a cheesecake was something that I had heard about, but never really understood the point of, until I read more about the science behind why you do it.
Cheesecake is basically just eggs and dairy, which means it is essentially a form of a custard. And once I started to think of it as a custard, water bathing made perfect sense, because water bathing custard is what you do to keep from over baking it.
The first cheesecake I water bathed turned out perfectly. First of all it had no crack, none at all. Cracks in cheesecakes are because they are over done and it was not over done after baking in the water bath.
Not only was there no crack in my cheesecake, it was the best texture that I have ever had in a homemade cheesecake. It was perfect and just like a cheesecake from a high end restaurant.
Every cheesecake I have made using the water bath method has been perfect in both appearance and texture.
Here is the basic method I follow for water bathing a cheesecake.
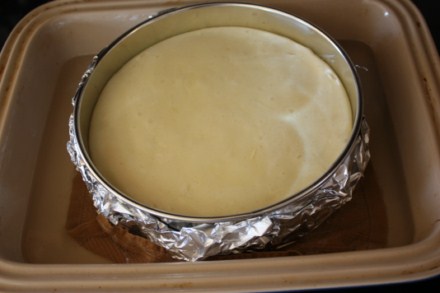
- Wrap the outside of the spring form pan in foil . This keeps the water from the water bath from leaking into the pan and making your crust soggy.
- Place a small cloth in the bottom of a large pan or roaster. This pan has to be large enough to hold the spring form pan.
- When your filling is ready to bake, place it in the spring form pan that has been wrapped in foil and set the pan into the larger roaster pan.
- Fill the outer pan with about 1 – 1 1/2 inches of very hot water. Thus, creating your water bath. This is pictured above.
- Place the whole thing in the oven and bake at 250 for 1 hour. And yes 250 is the correct temperature here. You cook it low and slow. And Do not open your oven while the cheesecake is baking.
- After the cheesecake has baked 1 hour, turn the oven off, but DO NOT open the oven.
- Leave the cheesecake in the oven for 1 more hour. It will continue to cook as the oven cools off.
- Remove cheesecake from oven and also from the water bath.
- Let cool in pan and refrigerate for several hours or over night. I prefer to make my cheesecakes the day before I serve them. I think they are better the day after I make them.
- Serve and enjoy!
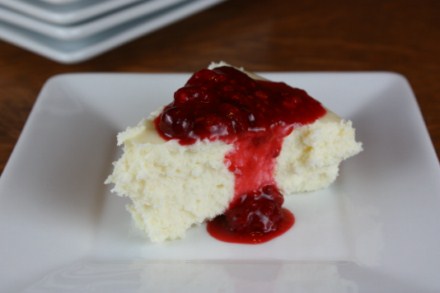
Coming tomorrow is the recipe for the White Chocolate Cheesecake pictured above. It is one of the best cheesecakes I have ever had. It was sooooo good.


Why the cloth? Is it so the cheesecake doesn’t slip slide around when you move the larger pan?
I, too, love making cheesecake. Usually, the room temp ingredients and careful mixing are enough to keep from getting cracks for me but I keep meaning to try a water bath to see how much texture difference it makes. It’s just hard to find a container large enough to fit the springform pan, as the only “roaster” I have is my Nesco. Hmm…there’s an idea…
@Karen, Yes, the cloth is used to keep it from slipping around. The nesco might just work well for that. Good idea.
Thank you for your tips on the water bath. I have enjoyed making cheesecakes for awhile now & have put a pan of water in the oven on the lower rack while the cheesecake bakes. I will definitely try the water bath next time. Do you have a tried & true recipe for a plain cheesecake. I have not made this type before & always tend to make chocolate cheesecakes.
omg the best cheesecake I’ve ever had is from Junior’s in NYC..pick up a slice the next time you’re in grand central terminal! its sooo good. My husband found a knock off recipe for it online and now he has to make it all the time lol
@Amy, If I ever make it to NYC that is already on my list of things to try. I have heard that it is the best cheesecake ever!
@Lynn,
we have tried the strawberry swirl and the raspberry swirl, but i am sure anything you try will be amazing!
Do you think if i wanted a biscuit base i could make it and just continue on with your directions?
@Lisa O Shea, I think this would work fine with a normal cheesecake type crust. I have seen recipes that use the waterbath method that have a crust.
Hi, in your cheesecake tips #5 , the temperature is 250, yet on the recipe for “crustless chocolate cheesecake” the temperature is 325. Which is the correct temperature for proper results?
@Shelley, I just fixed that. Thank you for pointing that out. The 250 is the correct temperature. I am really sorry about that, but it is now correct.
Your welcome, I just found your site yesterday and I can’t wait to try that recipe as well as others.
I used all your tips to create a recipe for my family and friends over the weekend. I was more then thrilled how all your tips helped. I wrote a little bit about it and shared your tips (with links to your blog).
You helped me create the perfect cheesecake! Thank you!
I am glad the tips worked for you. Your cheesecake looks great!
Hi! These are all helpful tips! I am making my first cheesecake today. I want to use the water bath but the recipe I have says it isn’t needed and it also says to bake at. Higher temperature for less time. Does your method work for all recipes?
Thanks!
I have tried it on a couple recipes and it works fine. I am not sure it works on all recipes, but I think for most it will.